This post may contain affiliate links. Please read our policy page.
Get ready for a spooktacular celebration with 15 delightful treats that’ll make your Halloween unforgettable! Whip up Ghostly Chocolate-Covered Pretzels for a crunchy, sweet surprise, or bake some eerie Spider Web Cupcakes that are perfect for your festive table. Mummy Hot Dogs are fun to prepare and delicious, while Witch’s Cauldron Dip offers a creepy yet creamy dip for your guests. Want to explore more hauntingly good ideas? There’s plenty more to discover for your Halloween festivities!
Ghostly Chocolate-Covered Pretzels
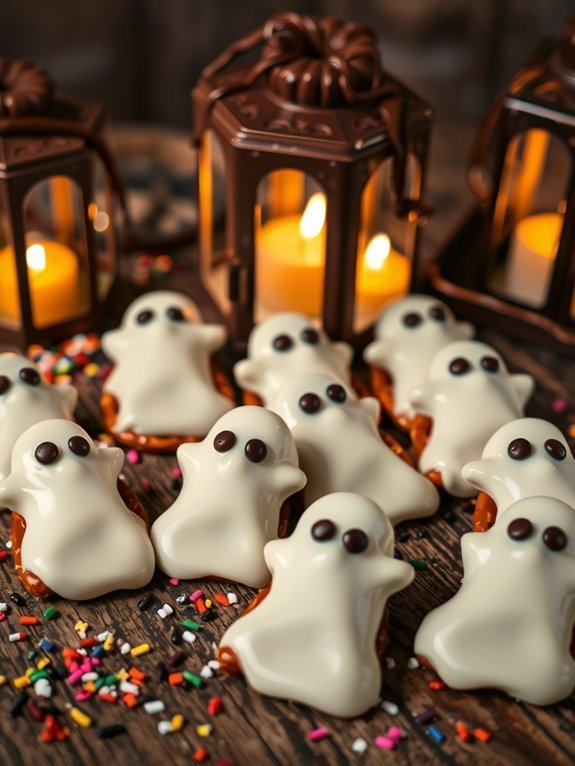
When Halloween rolls around, it’s time to get creative with spooky treats, and nothing says festive like Ghostly Chocolate-Covered Pretzels! These delightful snacks combine the crunch of pretzels with the sweetness of chocolate, making them a fun and easy treat for both kids and adults. You can customize them with various toppings or simply enjoy their ghostly appearance as they are.
Whether you’re hosting a Halloween party, going to a potluck, or just want a sweet snack to enjoy, these pretzels are sure to delight.
Making these Ghostly Chocolate-Covered Pretzels is a breeze, requiring minimal ingredients and effort. They can be prepared in under 30 minutes, making them a perfect last-minute addition to your Halloween festivities. With just a few simple steps, you’ll have a batch of adorable, spooky treats that everyone will love. Get ready to impress your friends and family with this fun and festive recipe!
- 1 bag of pretzel rods or regular pretzels
- 1 cup white chocolate chips or melting wafers
- Black decorating gel or chocolate chips for eyes
- Sprinkles (optional, for decoration)
Start by melting the white chocolate chips in a microwave-safe bowl in 30-second intervals, stirring in between until smooth. Once melted, thoroughly dip each pretzel into the white chocolate, allowing the excess to drip off before placing them on a parchment-lined baking sheet.
While the chocolate is still wet, use the black decorating gel or small chocolate chips to create eyes, giving them that classic ghostly look. Allow the pretzels to set completely, which can take about 15-20 minutes at room temperature or faster in the refrigerator.
For a more festive touch, consider adding colored sprinkles or drizzling additional melted chocolate over the finished pretzels to create more intricate designs. Make sure to work quickly, as the chocolate can harden, making it difficult to add decorations.
If you have a group of kids helping, set up a decorating station and let them release their creativity! Keep an eye on the melting process to avoid overheating the chocolate, and remember that allowing the excess chocolate to drip off guarantees a beautiful finish. Enjoy your spooky creations!
Spider Web Cupcakes
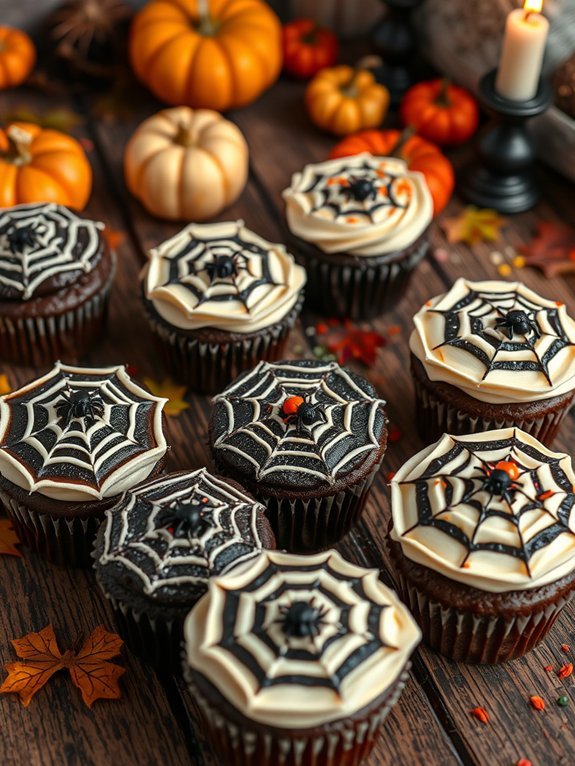
Spider Web Cupcakes are a delightful and spooky treat that will impress your guests at any Halloween gathering. These cupcakes aren’t only visually stunning but also delicious, making them the perfect addition to your Halloween festivities. The rich chocolate flavor paired with the creamy frosting mimics a spider web, with a few edible decorations to complete the eerie look.
Crafting these cupcakes is a fun activity to share with family and friends, and they’re sure to bring smiles to faces both young and old.
To begin, you’ll need to bake a batch of your favorite chocolate cupcakes. Once they’re cooled, it’s time to frost them with a creamy vanilla frosting that acts as the base for your spider web design. Using a piping bag, you’ll create a web-like pattern for that perfect spooky touch. Add some chocolate spiders or other creepy decorations on top to make your cupcakes even more festive. Follow this recipe, and you’ll have the spookiest treats on the block!
- 1 box chocolate cake mix (plus ingredients required on the box)
- 1 batch vanilla buttercream frosting
- Black food coloring (optional)
- 1 piping bag with a round tip
- Edible spider decorations (chocolate or gummy)
- Sprinkles or edible glitter (for extra decoration)
Bake the chocolate cupcakes according to the instructions on the box, then let them cool completely. In the meantime, prepare the vanilla buttercream frosting, mixing in black food coloring if you’d like a darker frosting.
Once the cupcakes are cooled, use a piping bag to swirl the frosting on top in a circular motion, then pipe additional small circles around the edge to create the spider web effect. Finish off with edible spider decorations for that eerie look.
When making Spider Web Cupcakes, feel free to get creative with the decorations! You can use different colors of frosting to make the webs or mix in some orange food coloring for a festive twist. If you’re not too keen on creating the spider web design, consider using a simple swirl pattern and placing a large spider decoration on each cupcake instead.
Remember to store the cupcakes in a cool place, especially if the frosting is homemade, to keep them fresh until your Halloween party. Enjoy your spooky bakes!
Mummy Hot Dogs
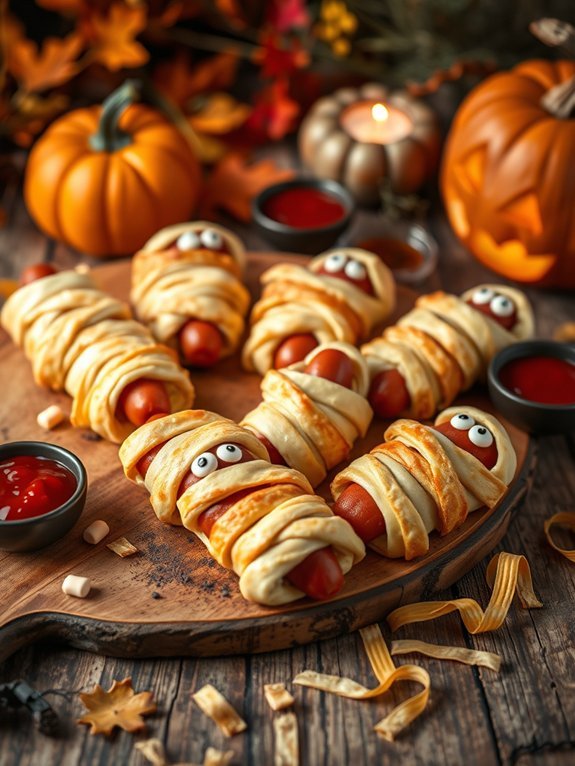
When the leaves begin to fall and the air turns crisp, Halloween is right around the corner, beckoning us to whip up some delightfully eerie treats. One of the most fun and festive recipes to indulge in is Mummy Hot Dogs. Not only are they simple to prepare, but they also add a spooky flair to any Halloween gathering.
Imagine hot dogs wrapped in strips of crescent dough, transforming into mummies as they bake to a golden brown—perfect for both kids and adults alike.
Mummy Hot Dogs come together in no time, making them an ideal addition to your Halloween festivities. You can serve them with a side of mustard or ketchup for dipping, which perfectly resembles blood for an added Halloween effect.
Get ready to channel your inner culinary ghoul as we plunge into this deliciously spooky recipe that will have everyone howling with delight.
Ingredients:
- 8 hot dogs
- 1 package of refrigerated crescent roll dough
- Mustard or ketchup (for dipping)
- Optional: candy eyes (for decoration)
To prepare your Mummy Hot Dogs, start by preheating your oven to 375°F (190°C). Unroll the crescent roll dough and separate it into triangles. Cut each triangle into thin strips—about ½ inch wide.
Take a hot dog and begin wrapping the dough strips around it, leaving a small gap for the “face” of the mummy, and ensuring some of the hot dog is still visible. Repeat this process for all the hot dogs, then place them on a baking sheet lined with parchment paper.
Bake in the preheated oven for about 12-15 minutes, or until the dough is golden brown. If you’re using candy eyes, push them onto the mummies before serving.
When making Mummy Hot Dogs, feel free to get creative with the appearance of your monsters. You can adjust the thickness of the dough strips, which can give your mummies a unique look.
Additionally, consider using different types of sausages or hot dogs, like turkey or veggie versions, to cater to a variety of dietary preferences. Finally, don’t forget the fun part—let your little ghouls help with the wrapping and adding eyes, turning this cooking adventure into a spooky family activity!
Witch’s Cauldron Dip
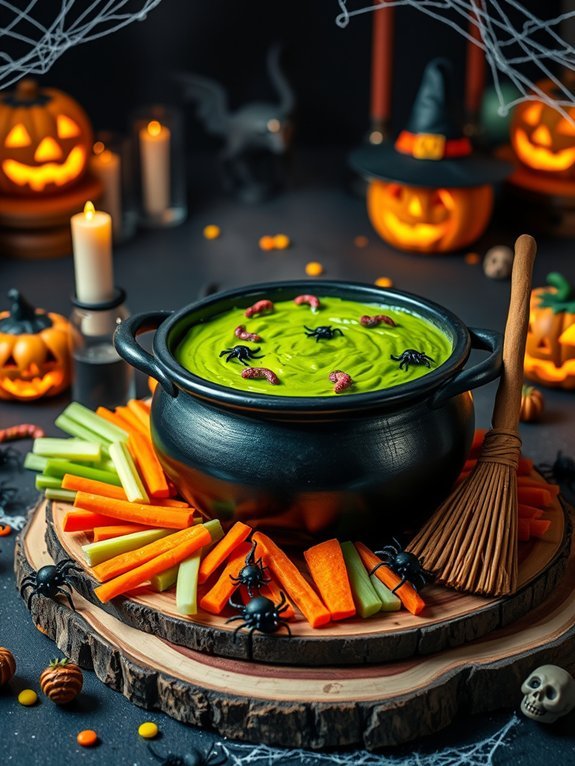
Get ready to stir up some eerie excitement at your Halloween gathering with this delightful Witch’s Cauldron Dip! This spooky, creamy dip isn’t only delicious but also a great way to add some festive flair to your snack table. It’s perfect for serving alongside an assortment of dippers such as crackers, vegetables, or even breadsticks shaped like broomsticks. The best part is that it’s simple to make, so you can whip it up quickly before your guests arrive.
The vibrant green color and whimsical presentation make this dip a showstopper that kids and adults alike will adore. To enhance the Halloween spirit, consider serving it in a cauldron-shaped bowl or even garnishing it with plastic spiders or gummy worms for that extra touch of frightful fun. Prepare to conjure some magical flavors and support your Halloween festivities with this bubbling cauldron of yumminess!
- 1 cup cream cheese, softened
- 1 cup sour cream
- 1 cup shredded cheddar cheese
- 1 cup spinach, chopped (fresh or frozen)
- 1/2 cup green onions, chopped
- 1 packet ranch seasoning mix
- Black olives for garnish (optional)
- Vegetable dippers (carrots, celery, bell peppers)
In a large mixing bowl, combine the softened cream cheese, sour cream, shredded cheddar cheese, chopped spinach, green onions, and ranch seasoning mix. Use a hand mixer or a spatula to blend the ingredients until well incorporated and smooth.
Transfer the mixture to a serving bowl, spreading it evenly to create a “cauldron” effect. If desired, you can garnish the dip with sliced black olives to resemble a bubbling cauldron and serve with an array of crunchy vegetable dippers for a hauntingly good time.
For a more intense flavor, consider adding shredded cooked chicken or jalapeños to the dip, but keep in mind the spice level for your guests. Additionally, if you want a thicker dip, reduce the amount of sour cream or allow the dip to chill in the refrigerator for 30 minutes before serving.
This dish can be made ahead of time and stored in the fridge, allowing the flavors to meld beautifully before it makes its appearance at your Halloween festivities!
Pumpkin Pie Bites
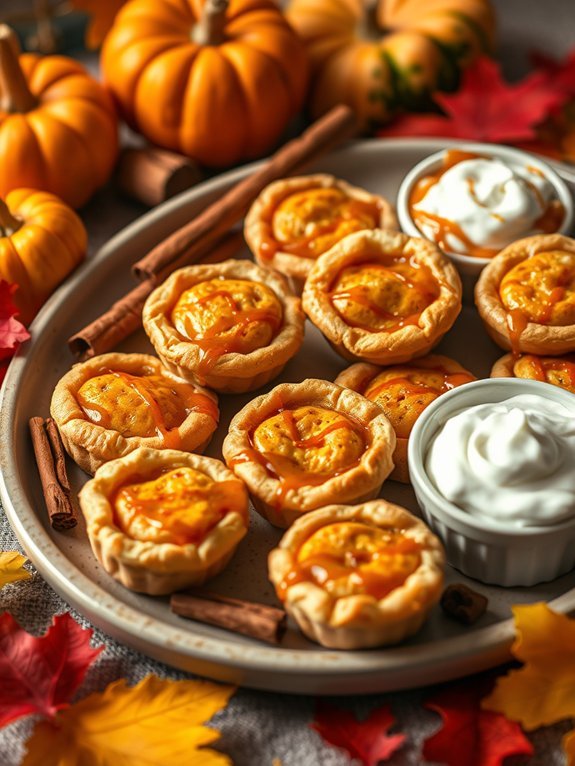
Pumpkin pie bites are a delightful twist on the classic autumn favorite, combining the warm, aromatic flavors of pumpkin spice with a convenient bite-sized form.
These mini desserts are perfect for Halloween gatherings, Thanksgiving celebrations, or simply a cozy fall treat. With just the right amount of sweetness and a flaky crust, they’re sure to please both kids and adults alike.
Making pumpkin pie bites isn’t only fun but also an excellent opportunity to involve the little ones in the kitchen. As you roll out the dough and fill each bite with creamy pumpkin goodness, the house will be filled with the enticing scents of cinnamon and nutmeg.
Plus, these treats are versatile; you can easily customize them with your favorite toppings, from whipped cream to a drizzle of caramel.
- 1 package of pre-made pie crusts
- 1 can (15 oz) of pure pumpkin puree
- 1 cup of sweetened condensed milk
- 2 large eggs
- 1 teaspoon ground cinnamon
- 1/2 teaspoon ground nutmeg
- 1/4 teaspoon ground ginger
- 1/4 teaspoon salt
- Optional: whipped cream for serving
Preheat your oven to 350°F (175°C) and lightly grease a mini muffin tin.
Roll out the pie crusts on a lightly floured surface and cut them into small circles, large enough to fit into the muffin cups. Press the dough gently into the cups to form a little shell.
In a mixing bowl, whisk together the pumpkin puree, sweetened condensed milk, eggs, cinnamon, nutmeg, ginger, and salt until well combined.
Carefully pour the pumpkin mixture into each pie crust, filling them about three-quarters full. Bake for 15-18 minutes, or until the filling is set.
Allow them to cool for a few minutes before removing from the muffin tin and serving with a dollop of whipped cream if desired.
When preparing pumpkin pie bites, you can make them ahead of time and store them in the refrigerator until you’re ready to serve, making your Halloween or fall festivities stress-free.
Consider experimenting with variations by adding chocolate chips or swapping out spices for chai spice for a unique twist.
Remember to keep an eye on baking times since mini treats can cook faster than traditional pies, ensuring they don’t overbake. Enjoy the process and have fun making these adorable treats!
Recommended Items
Get ready to whip up some frightfully delicious treats with our top picks!
Products
Creepy Crawly Jelly Cups
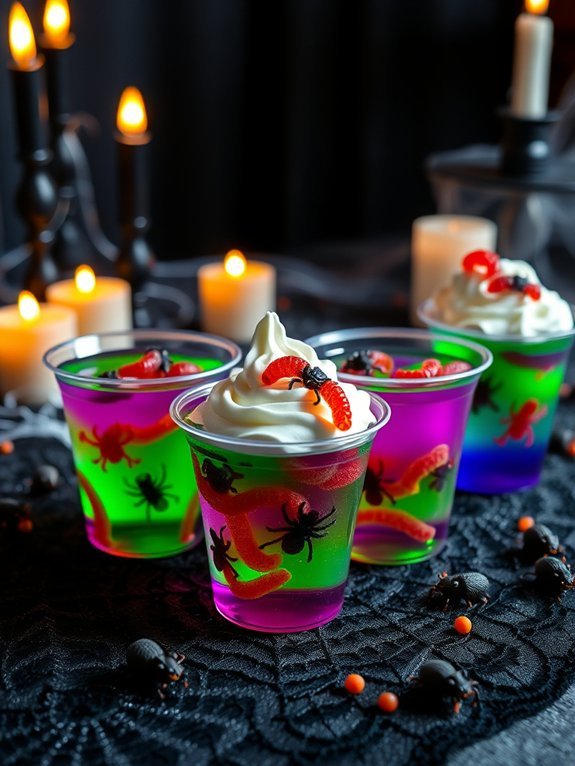
Get ready for a Halloween celebration that will thrill and chill your guests with these Creepy Crawly Jelly Cups! This fun and visually striking dessert is perfect for parties and will certainly become the star of the show. Made with vibrant jelly and creepy gummy insects, these treat cups are sure to delight kids and adults alike.
Plus, they’re incredibly easy to prepare, allowing you to whip them up in no time!
To make these spooky jelly cups, you can customize the flavors to suit your taste. Choose from a variety of fruity jellies and match them with an assortment of gummy insects for a truly spine-tingling effect. Whether you’re celebrating a Halloween gathering, eerie-themed birthday party, or just enjoying the haunting season, these treats will surely add a delightful scare to your table.
Ingredients:
- 1 packet of gelatin (your choice of flavor)
- 1 cup boiling water
- 1 cup cold water
- Gummy insects (such as spiders and worms)
- 4 clear plastic cups or jars
- Optional: Whipped cream or gummy worms for garnish
Pour the boiling water into a mixing bowl and dissolve the gelatin in it, stirring well. Next, add the cold water and mix until fully combined.
Pour the mixture evenly into the plastic cups, filling them about halfway. Drop a few gummy insects into each cup, ensuring they’re fully submerged, then place the cups in the refrigerator for about 4 hours or until the jelly is set.
Once set, you can top with whipped cream and add additional gummy worms for extra flair before serving!
When making Creepy Crawly Jelly Cups, feel free to experiment with different flavor combinations and types of gummy candy to create your perfect concoction. If you’d like to add an extra creepy touch, consider adding a layer of whipped cream on top before placing the gummy insects; this won’t only make them look more realistic but also provide a creamy contrast to the gelatin.
Always remember to keep the cups refrigerated until ready to serve to maintain the jelly’s consistency and chill factor!
Monster Rice Crispy Treats
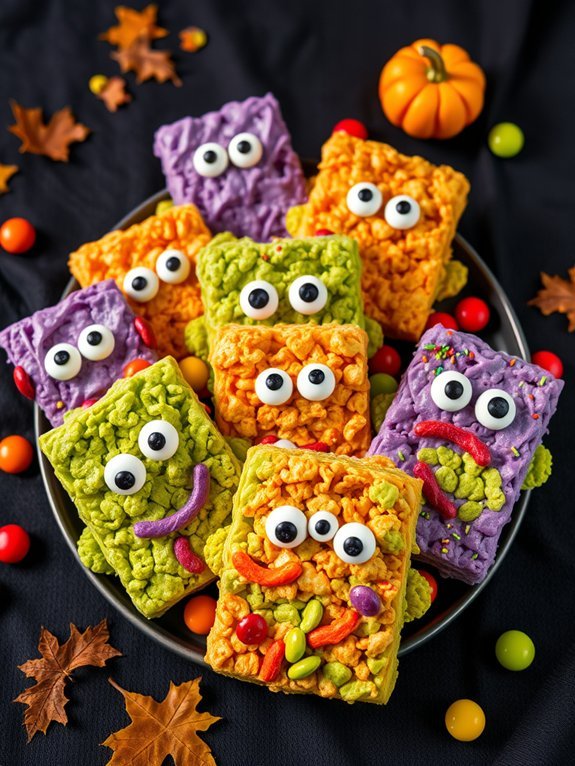
Monster Rice Crispy Treats are delightfully spooky and versatile treats that are perfect for Halloween or any spooky celebration. These treats combine the classic flavors of marshmallow and crispy rice cereal with vibrant colors and fun toppings that make them stand out.
They’re easy to make and can be enjoyed by kids and adults alike, making them a fantastic addition to your Halloween festivities.
To start the cooking process, gather your ingredients and prepare a clean workspace. You can use a greased baking dish or muffin tins for shaping the treats into fun monster forms. With a little creativity, you can also personalize them with candy eyes, colorful sprinkles, or even edible glitter to add an extra spooktacular touch.
Ingredients:
- 6 cups of rice cereal
- 4 cups of mini marshmallows
- 3 tablespoons of butter
- Food coloring (green, purple, or any desired color)
- Edible eyes
- Assorted Halloween candies (like gummy worms, M&Ms, or chocolate chips)
- Cooking spray or additional butter (for greasing)
To make the Monster Rice Crispy Treats, begin by melting the butter in a large pot over low heat. Once melted, stir in the mini marshmallows, mixing until fully melted and smooth.
If you want to add color, drop in a few drops of food coloring and mix until evenly distributed. Remove from heat, then add the rice cereal, stirring until well combined. Press the mixture into your greased baking dish or mold into monster shapes using your hands.
Add the edible eyes and candies on top before the treats cool completely. For a fun twist, consider varying the colors of your treats by dividing the mixture and using different food colorings, creating a colorful array of monsters.
When shaping, dampening your hands with butter or water can help prevent sticking. Additionally, you can create themed variations by mixing in different candies covered in chocolate or using cookie cutters to cut out unique shapes once the mixture is cool.
Enjoy making these monster treats, and don’t be afraid to get creative with your decorating!
Eyeball Pasta Salad
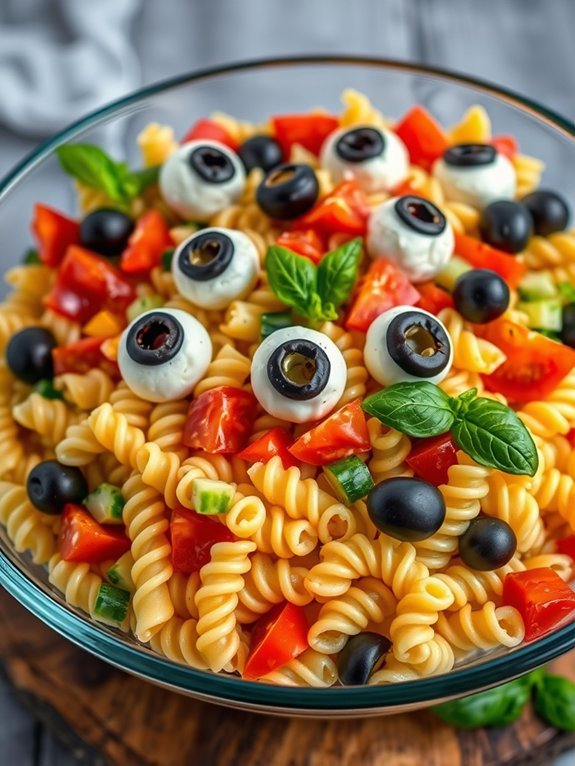
As Halloween approaches, it’s time to start planning creative and spooky treats that will delight and surprise your guests. One fun and festive dish you can make is Eyeball Pasta Salad, which combines delicious pasta with a medley of colorful veggies, all topped off with unique eyeball-shaped ingredients for a deliciously creepy effect.
This dish not only packs a flavorful punch but also adds a whimsical touch to your Halloween spread, making it perfect for parties or family gatherings.
To make your Eyeball Pasta Salad, you’ll need to think outside the box. The pasta serves as a great base, while assorted vegetables add crunch and color. To enhance the Halloween theme, you can finish the salad with mozzarella balls and olives, cleverly resembling eyeballs peering out from the salad.
With minimal effort, this dish will capture the essence of Halloween while being a crowd-pleaser that both kids and adults will love.
Ingredients:
- 1 pound of rotini or any pasta of your choice
- 1 cup cherry tomatoes, halved
- 1 cup cucumber, diced
- 1 bell pepper, diced (any color)
- 1 cup black olives, pitted and halved
- 1 cup mozzarella balls (bocconcini)
- 1 tablespoon olive oil
- 1 teaspoon Italian seasoning
- Salt and pepper to taste
- Fresh basil leaves, for garnish
Cook the pasta according to package instructions until al dente. Once cooked, drain and rinse under cold water to cool the pasta.
In a large bowl, combine the pasta with cherry tomatoes, cucumber, bell pepper, black olives, mozzarella balls, olive oil, and Italian seasoning. Season with salt and pepper to taste.
Gently mix everything together until well combined. For the ultimate spooky presentation, arrange the mozzarella balls in the salad to resemble “eyeballs,” using a slice of black olive on top of each for the pupil.
For added flair, consider mixing in a squeeze of lemon juice to brighten the flavors and using colorful pasta types to enhance the visual appeal.
If you want to prepare the salad ahead of time, keep the dressing separate until you’re ready to serve to avoid sogginess. Also, feel free to get creative by adding ingredients like chopped spinach, herbs, or other favorite veggies to give the salad your personal twist while maintaining the eerie look for Halloween festivities.
Spooky Treat Preparation Guide
Haunted Graveyard Dirt Cups
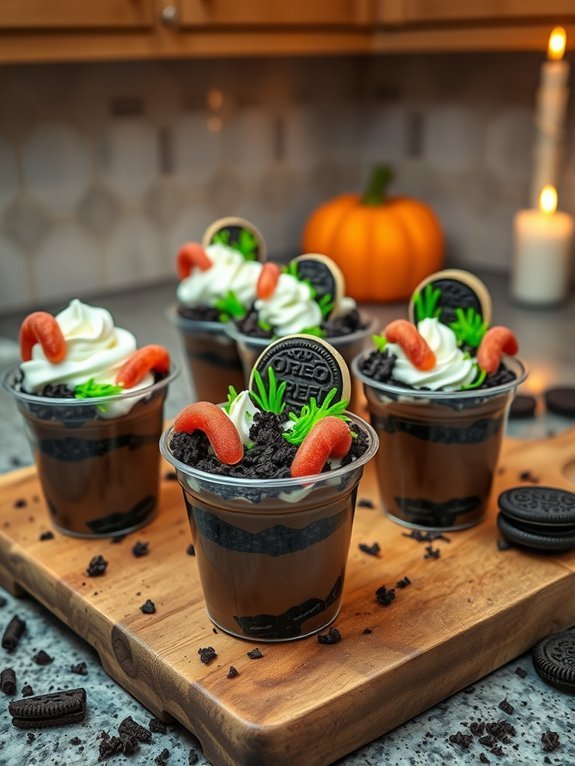
Haunted Graveyard Dirt Cups are a fun and spooky dessert perfect for Halloween festivities! These delightful treats resemble little pots of dirt filled with worms and tombstones, sure to thrill kids and adults alike. With layers of creamy chocolate pudding, crushed cookies, and clever decorations, these cups combine a little fright with delectable flavor, making them an ideal addition to your party spread or a fun activity to enjoy with the family.
Creating these spooky cups is as easy as mixing and layering, allowing for creativity in decorating. Whether you use gummy worms crawling out of the chocolate “dirt” or edible tombstone cookies to enhance the eerie effect, these dirt cups can be tailored to your imagination. Ideal for Halloween parties, classroom treats, or as a whimsical dessert for the family, Haunted Graveyard Dirt Cups will surely be a crowd-pleaser.
Ingredients:
- 1 package (3.9 oz) instant chocolate pudding mix
- 2 cups milk
- 1 package (16 oz) Oreo cookies
- 1 container (8 oz) whipped topping (like Cool Whip)
- Gummy worms
- Edible tombstone cookies (or homemade with frosting)
- Plastic cups or small containers for serving
To prepare the Haunted Graveyard Dirt Cups, begin by whisking together the instant chocolate pudding mix and milk in a mixing bowl until it thickens, typically about 2 minutes.
Crush the Oreo cookies in a zip-top bag or food processor until they resemble dirt, leaving some larger pieces for added texture. In your plastic cups, layer the pudding first, followed by a generous layer of crushed Oreo cookies, and repeat until the cups are filled about three-quarters full.
Top the “dirt” layer with whipped topping, add gummy worms crawling on top, and finally stick in the edible tombstones for the finishing touch.
As you assemble your Haunted Graveyard Dirt Cups, feel free to have fun with the decorations! You can make homemade tombstones by using graham crackers and frosting to write spooky messages.
For an extra creepy touch, consider using green food coloring in the whipped topping to create a more eerie “grass” effect. If you’re preparing these treats in advance, store them in the refrigerator until you’re ready to serve to maintain the freshness of the ingredients.
Enjoy your spooky Halloween creation!
Gummy Worm Popsicles
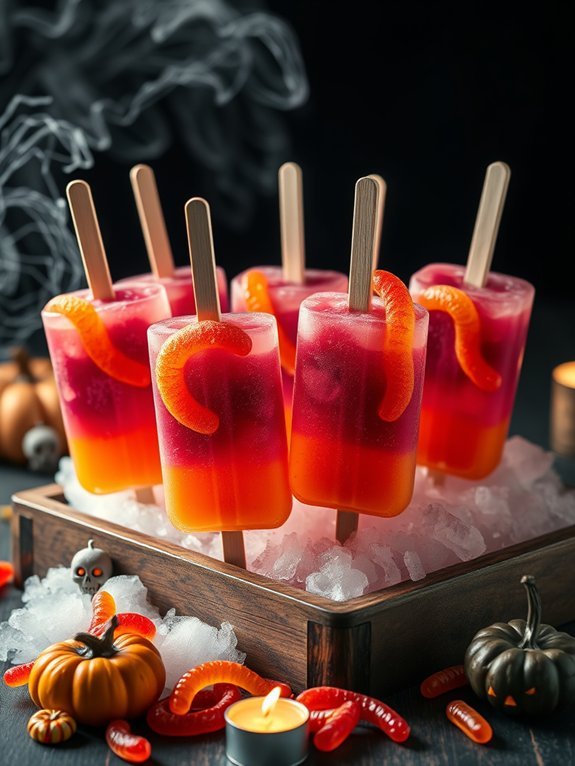
As Halloween approaches, adding a spooky twist to your treats can make your festivities even more fun. One easy yet creative treat to make is Gummy Worm Popsicles. These colorful, wiggly snacks aren’t just a visual delight; they’re also a delectable treat that kids and adults alike will enjoy. Perfect for a Halloween party or just an afternoon snack, these popsicles are sure to bring a smile to anyone’s face.
Creating Gummy Worm Popsicles is a simple endeavor that allows you to customize the flavor and color to suit your preferences. By using fruit juice and gummy worms, you can combine delicious taste with an eerie visual. The process involves pouring fruit juice into molds, adding the gummy worms, and then freezing them until solid. These popsicles aren’t only a fun treat; they also serve as a conversation starter and a festive decoration.
Ingredients:
- 2 cups of your favorite fruit juice (such as apple, grape, or orange)
- 1 cup gummy worms
- Popsicle molds
- Wooden sticks (if molds don’t come with them)
Pour the fruit juice into your popsicle molds, filling them about halfway. Next, drop in gummy worms, positioning them however you like, then fill the molds to the top with more fruit juice. Insert the wooden sticks, if necessary, and carefully place the molds in the freezer.
Allow the popsicles to freeze for at least 4-6 hours, or until fully hardened. Once frozen, run warm water over the outside of the molds for a few seconds to help release the popsicles before serving.
When making Gummy Worm Popsicles, consider using a mix of different fruit juices for added flavor depth and visual appeal. For instance, a combination of orange juice and grape juice can create a fun, layered effect.
Additionally, feel free to experiment with other candies or fruits in place of gummy worms, such as gummy spiders or fruit pieces, to further enhance the Halloween theme. Your spooky creations can also be stored in the freezer for several days, allowing you to prepare them in advance for your Halloween festivities.
Skeleton Veggie Platter
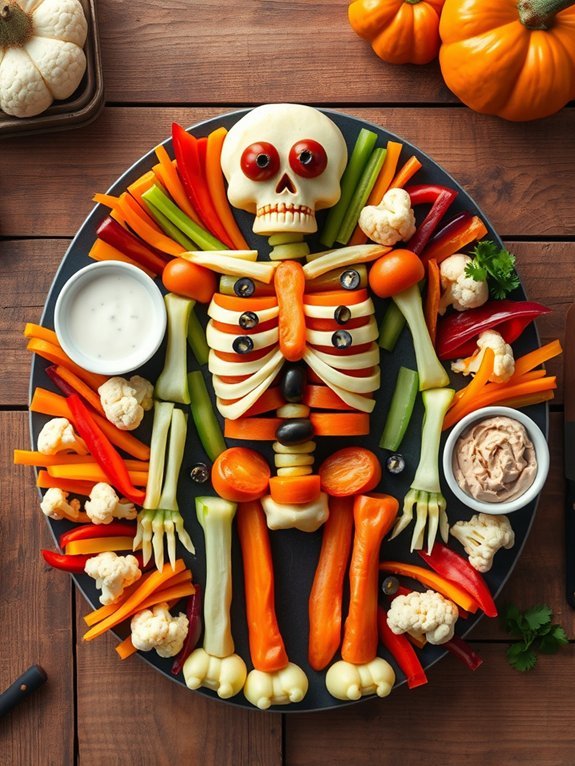
Create an eye-catching Skeleton Veggie Platter this Halloween that will delight guests of all ages. This creative appetizer not only provides a healthy option amidst the candy and sweets but also adds a festive touch to any Halloween gathering. Arranging fresh vegetables in the shape of a skeleton can be a fun activity to engage kids and get everyone in the holiday spirit, making it a perfect centerpiece for your party table.
The vibrant colors and shapes of the veggies will also appeal to health-conscious guests. For the platter, you can use various vegetables to create the skeleton’s head, ribcage, limbs, and joints. The design is flexible, allowing you to choose your favorite vegetables or whatever you have on hand. Just let your creativity flow! Serve it with a tasty dip, like hummus or ranch dressing, for an extra flavor boost that will have everyone coming back for more.
- Carrots
- Celery stalks
- Cherry tomatoes
- Cucumber
- Bell peppers (red, yellow, or orange)
- Cauliflower florets
- Broccoli florets
- Black olives
- Dips (hummus, ranch dressing, or your favorite)
To assemble your Skeleton Veggie Platter, begin by placing a large, flat serving tray or platter on a clean surface. Start by arranging the ribs using multiple carrot sticks and celery stalks standing upright in the center of the tray.
Use cherry tomatoes for the head, positioning them above the ribcage. Add cucumber slices for arms and legs, and create the joints using black olives. Finally, place cauliflower florets on the sides to represent the skeleton’s bones, enhancing the eerie look.
When preparing your Skeleton Veggie Platter, it’s crucial to wash all vegetables thoroughly before cutting them. Consider cutting the veggies into fun shapes or using a cookie cutter for the cucumbers and bell peppers.
For added fun, include a few slices of a spooky fruit, like strawberries or pineapple, to contrast with the veggies. Encourage kids to help place the vegetables on the tray; this not only makes the design process more enjoyable, but it also promotes healthy eating habits while they learn about various vegetables.
Blood Red Smoothies
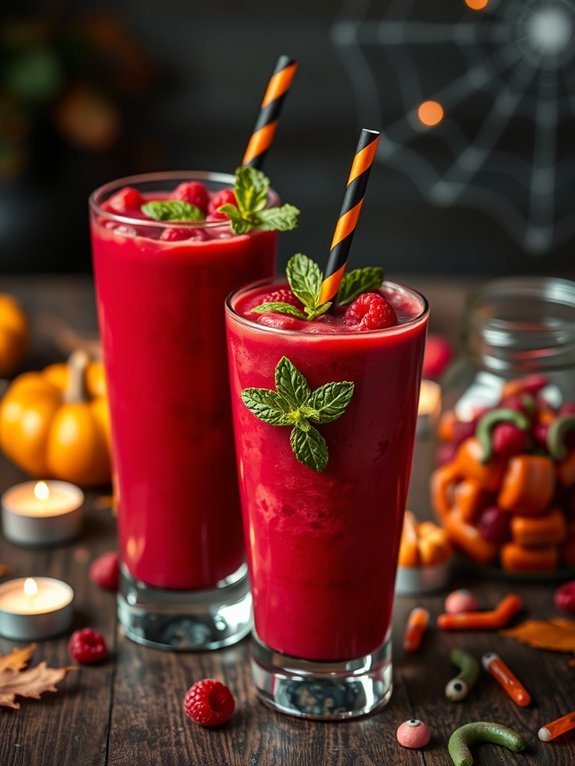
When the leaves start to turn and the nights grow longer, there’s no better way to set the mood for Halloween than with a spooky, blood red smoothie. This chilling drink won’t only tantalize your taste buds but also add an eerie aesthetic to your Halloween gathering.
Picture a vibrant, ruby-red concoction that’s both delicious and ghoulishly delightful—perfect for all the ghosts and goblins in attendance. Crafted from a blend of fresh fruits, this smoothie is as nutritious as it’s visually striking. You can use strawberries, raspberries, or even a splash of beet juice to create the blood-like hue.
Adding a few fun garnishes will enhance the spooky theme while ensuring that your guests will remember this treat long after the night is over. Let’s plunge into this festive recipe!
- 1 cup frozen strawberries
- 1 banana
- 1 cup unsweetened almond milk (or any milk of your choice)
- ½ cup raspberries
- 1 tablespoon honey or maple syrup (optional)
- 1 tablespoon beet juice (for added color)
- Ice cubes (optional, for a thicker consistency)
Combine all the ingredients in a blender and blend on high until smooth and creamy. If you prefer a thicker smoothie, you can add ice cubes and blend again until you reach your desired consistency. Pour the mixture into a spooky-themed glass, and feel free to garnish with a sprig of mint or a few more berries on top for an extra festive touch.
For a truly frightening presentation, consider serving your smoothies in clear cups adorned with spooky stickers or Halloween-themed straws. You can also create a “bloody” effect by drizzling some raspberry sauce or beet juice along the sides of the glasses before pouring in the smoothie.
To make this treat even more fun, allow your guests to add their own spooky garnishes, such as gummy worms or candy eyeballs, for a playful twist that encourages creativity.
Bone-Chilling Cheeseball
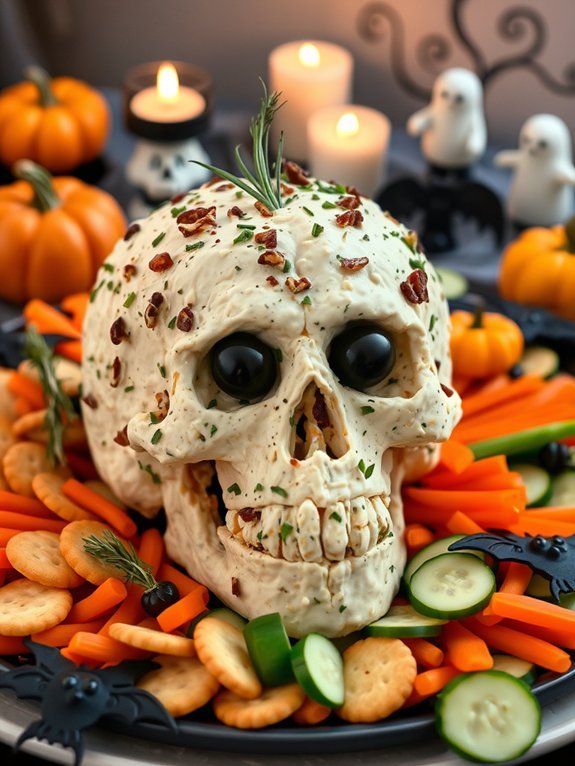
As Halloween approaches, it’s time to get creative in the kitchen and whip up some spooky treats that will delight both children and adults alike. One standout dish that fits perfectly with the theme is the Bone-Chilling Cheeseball. This eerie centerpiece not only stands out on any Halloween table but also serves as a delicious snack that guests can’t resist. With its creamy texture and savory flavor, this cheeseball can be shaped to resemble a skull or other frightful shapes, making it a fun activity for the whole family.
Making a Bone-Chilling Cheeseball is simple and brings out your inner culinary monster. You can play around with different cheese flavors and accompaniments to create the perfect blend. Pair it with eerie-looking crackers, sliced vegetables, or even a selection of spooky dips. Not only is this cheeseball a tasty treat, but its frightful presentation will be sure to impress your Halloween party guests and keep them coming back for more!
- 2 (8 oz) packages cream cheese, softened
- 1 cup shredded sharp cheddar cheese
- 1 cup crumbled feta cheese
- 2 green onions, chopped
- 1 clove garlic, minced
- 1 teaspoon Worcestershire sauce
- 1 teaspoon dried dill
- 1/2 teaspoon salt
- 1/4 teaspoon pepper
- 1/4 cup toasted pecans (for texture)
- Black olives (for decorating)
In a large mixing bowl, combine the softened cream cheese, shredded cheddar cheese, crumbled feta, green onions, minced garlic, Worcestershire sauce, dried dill, salt, and pepper. Mix everything together thoroughly until well combined and creamy.
Shape the mixture into a skull-like shape or any other spooky form of your choice. Once shaped, wrap the cheeseball in plastic wrap and refrigerate for at least two hours to firm up.
When ready to serve, unwrap the cheeseball and sprinkle the toasted pecans over it for extra texture. Decorate with black olives to add eerie eyes, making it look like a bone-chilling masterpiece.
For best results, use fresh herbs and cheese for maximum flavor. You can customize the seasoning and cheese choices to suit your taste preferences. If you’re not a fan of pecans, other nuts or even crispy bacon bits can add a delightful crunch.
To make this treat even more fun, create a Halloween-themed platter with additional veggie sticks, grapes, and spooky-shaped crackers around the cheeseball. Finally, serving this dish at room temperature will enhance the flavors, so make sure to take it out of the fridge a few minutes prior to serving.
Enjoy your spook-tacular creation!
Candy Corn Parfaits
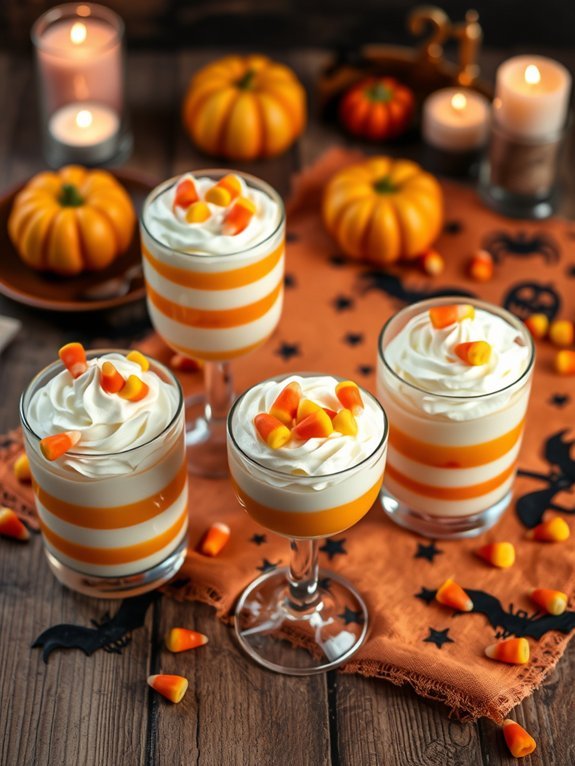
Candy Corn Parfaits are a fun and festive treat that perfectly embodies the spirit of Halloween. With their vibrant layers resembling the classic candy corn, these parfaits aren’t only visually appealing but also incredibly delicious. They can be made with simple ingredients, making them a great option for parties or a fun activity with the kids as Halloween approaches.
To make Candy Corn Parfaits, you’ll be using layers of whipped cream, vanilla pudding, and orange gelatin, all topped off with a sprinkle of candy corn. These delectable layers create a beautiful contrast of colors, making the parfaits a stylish addition to any Halloween celebration. Plus, they’re easy to prepare and can even be made in advance, allowing you to enjoy the festivities without spending too much time in the kitchen.
- 1 cup of vanilla pudding mix
- 2 cups of milk
- 1 package (3 oz) of orange gelatin
- 1 package (3 oz) of lemon gelatin
- 1 cup of whipped cream
- 1 cup of candy corn
- Clear plastic cups or parfait glasses
Begin by preparing the vanilla pudding according to the package instructions, mixing the pudding mix with the milk until thickened. Once it’s ready, in a clear plastic cup or parfait glass, start layering the ingredients: first, add a layer of the vanilla pudding, followed by a layer of the orange gelatin (prepared according to the package instructions), then add a layer of whipped cream.
Repeat these layers until the glasses are filled, finishing with a layer of whipped cream on top. Finally, garnish with candy corn for a delightful touch.
When making your Candy Corn Parfaits, it’s important to confirm that the gelatin layers are set properly before adding the next layer. You may want to let each layer chill in the refrigerator for about 15 minutes before adding the next to achieve neat and distinct layers.
Also, feel free to get creative with the garnishes – try adding crumbled cookies, chocolate shavings, or even a drizzle of caramel to enhance both the flavor and presentation!
Frighteningly Delicious Caramel Apples
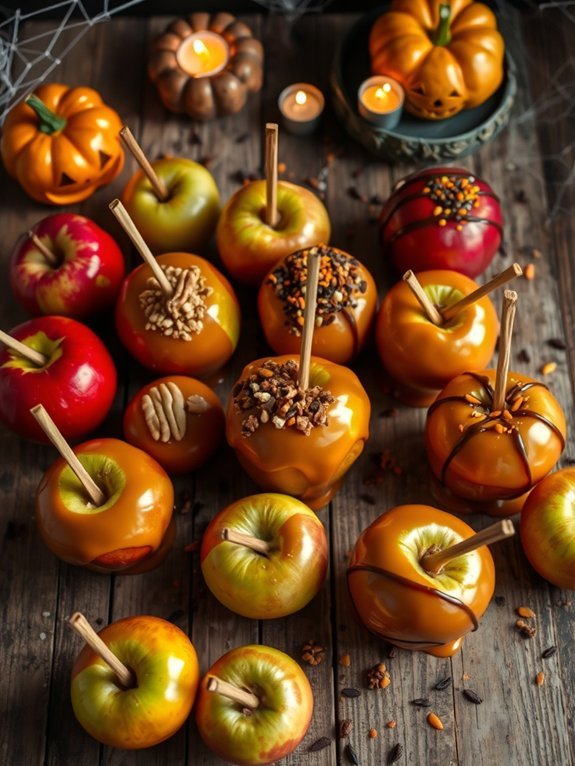
Caramel apples are a classic Halloween treat that perfectly combines the juiciness of fresh apples with the rich sweetness of caramel. Not only are they a delightful snack to enjoy during spooky season, but they also make for a great activity to do with kids or friends. By following this recipe, you’ll create frightfully delicious caramel apples that will have everyone forgetting about their candy stash. Feel free to get creative with toppings and decorations to make them extra spooky!
To elevate your caramel apples even further, consider using a variety of apple types such as Granny Smith for a tart contrast or Honeycrisp for their natural sweetness. You can also add food coloring to your caramel to give it a vibrant hue or use different toppings like crushed cookies, nuts, or sprinkles to match your Halloween theme. This delicious treat isn’t only fun to make but also perfect for sharing at Halloween parties or for handing out to trick-or-treaters.
- 6 medium-sized apples (Granny Smith, Honeycrisp, or your choice)
- 2 cups granulated sugar
- 1/2 cup unsalted butter
- 1/2 cup light corn syrup
- 1 can (14 oz) sweetened condensed milk
- 1 teaspoon vanilla extract
- Pinch of salt
- Sticks or skewers for apple dipping
- Optional toppings: crushed nuts, Halloween sprinkles, or chocolate drizzle
Begin by washing and drying the apples thoroughly. Remove the stems and insert a stick or skewer into the top of each apple for easy handling.
In a medium-sized saucepan, combine granulated sugar, butter, corn syrup, sweetened condensed milk, vanilla extract, and a pinch of salt. Cook over medium heat while stirring continuously until the mixture comes to a boil. Continue boiling without stirring for about 5-7 minutes, or until the caramel reaches a golden-brown color.
Remove from heat and allow to cool slightly before dipping each apple into the caramel, making sure to coat them evenly. Place the dipped apples on parchment paper to cool completely and, if desired, sprinkle with your choice of toppings.
When making caramel apples, it’s important to work quickly but carefully once the caramel reaches the desired temperature, as it can harden fast. If you want a thicker coating, you can dip the apple multiple times. Also, verify your apples are at room temperature before dipping to help the caramel stick better.
Store your finished caramel apples in a cool, dry place or in the refrigerator if your toppings require it, but avoid wrapping them tightly to prevent the caramel from sticking. Enjoy your spooky treats!

